RockIT Lock Portal is a web based interface that enables the permission management of smart lock devices deployed through a set of functional menu’s. The portal is integrated with the RockIT Lock mobile phone app to communicate through Bluetooth with each smart lock device.
RockIT Lock technology enables the transfer and collection of lock and user permission information in both online and offline environments. This information can be used by the client to assist with the best management and control of those requiring access through their lock points.
Dashboard
There Dashboard menu provides a overview of the number of smart lock devices loaded onto the RockIT Portal their assignment to lock groups and teams. The drop pin when selected shows who last unlocked this site.

Menu's
Provide access to the RockIT Web Portal System.
Locks
The Locks page is where you manage your locks
1 The Locks page is where you manage your locks
2 When you receive a new lock, press ‘Activate’ and follow prompts to start using it.
3 Click column headings to sort locks by that category
4 Type, or select options, in the filter row to filter by attributes
5 Click pencil icon to edit a lock’s settings. To grant access to one or more locks, select
locks with the checkboxes, then click ‘Share’ at top right.
6 Click the arrow at right, to see some more details about a lock
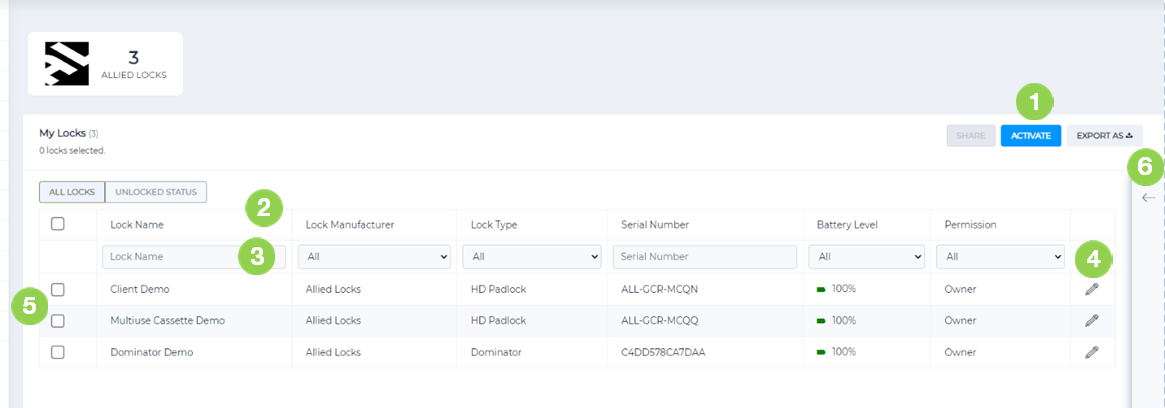
Lock Detail TIPS
- Use a standard naming convention in the Name field.
- Names should be obvious to the site.
- Each smart lock has a unique serial number shown on the device or code attached in packaging.
- Use the enable Offline option when smart lock sites are away from cellular coverage or may have intermittent coverage.
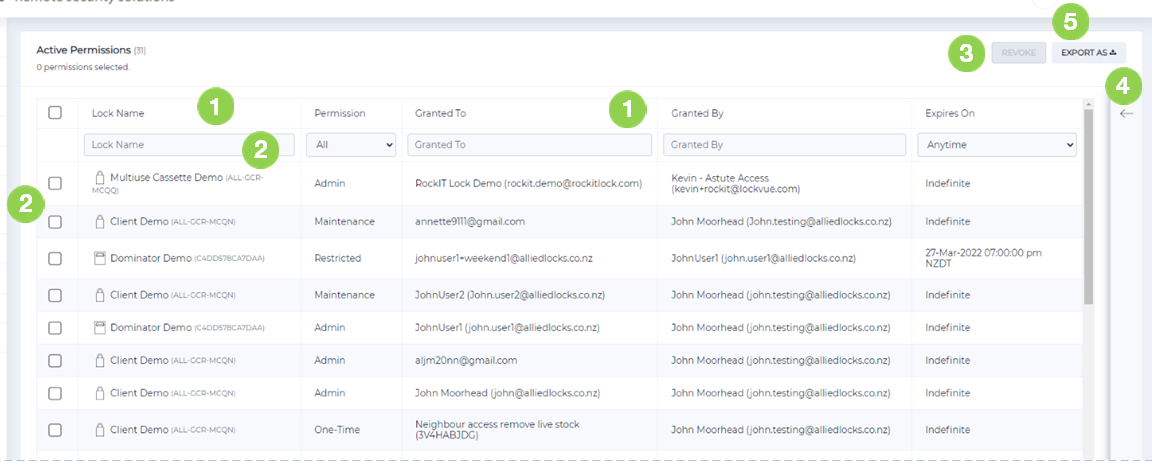
 Permissions
The Permission page is where you can check user access to locks and revoke if necessary.
Only locks that you are the owner of, or have ‘Admin’ access to, will show on this page
1 Click column headings to sort by that category and refine attributes.
2 Type, or select options, in the filter row to filter by attributes
3 To revoke one or more permissions, select with the checkbox, then click ‘Revoke’ at top right
4 Click the arrow at right of screen to see some more details about a permission
5 Select Export As button to export permission data as a csv or pdf.
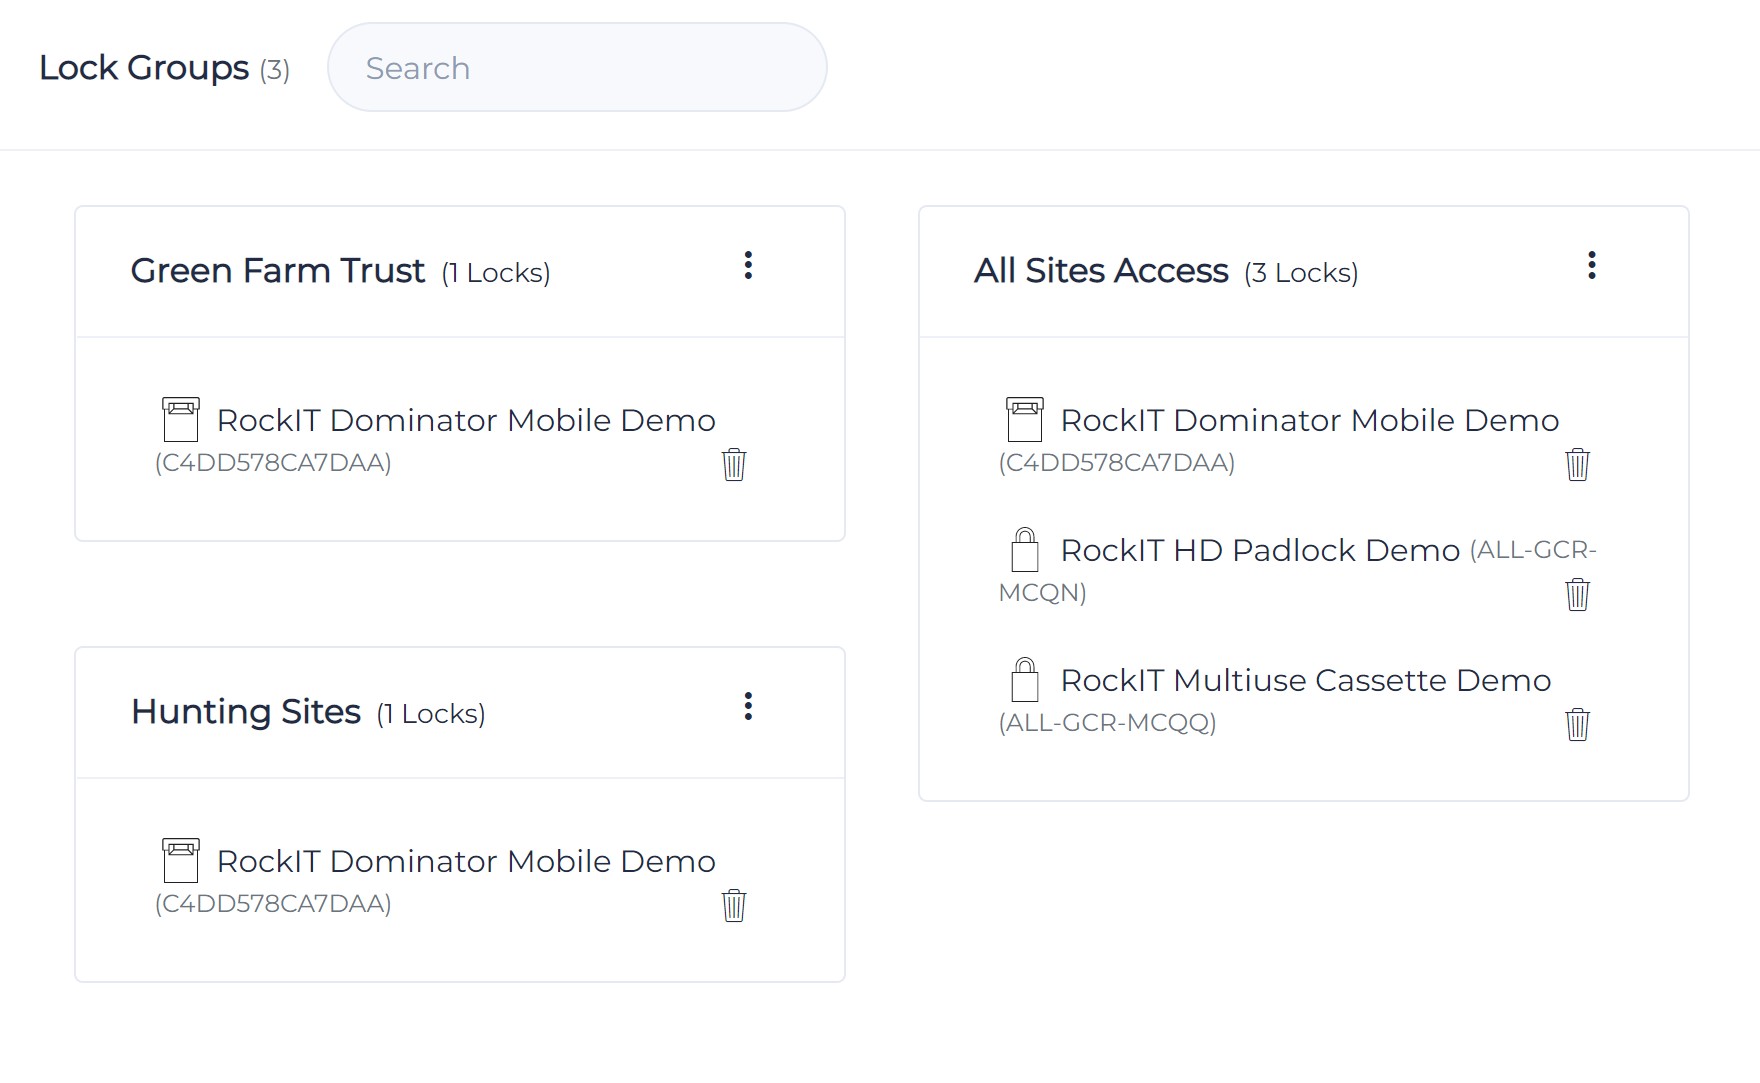
Lock Groups
The Lock Group page is where you can group together locks that have a common relationship. Simply create a suitable group name and add the required locks.
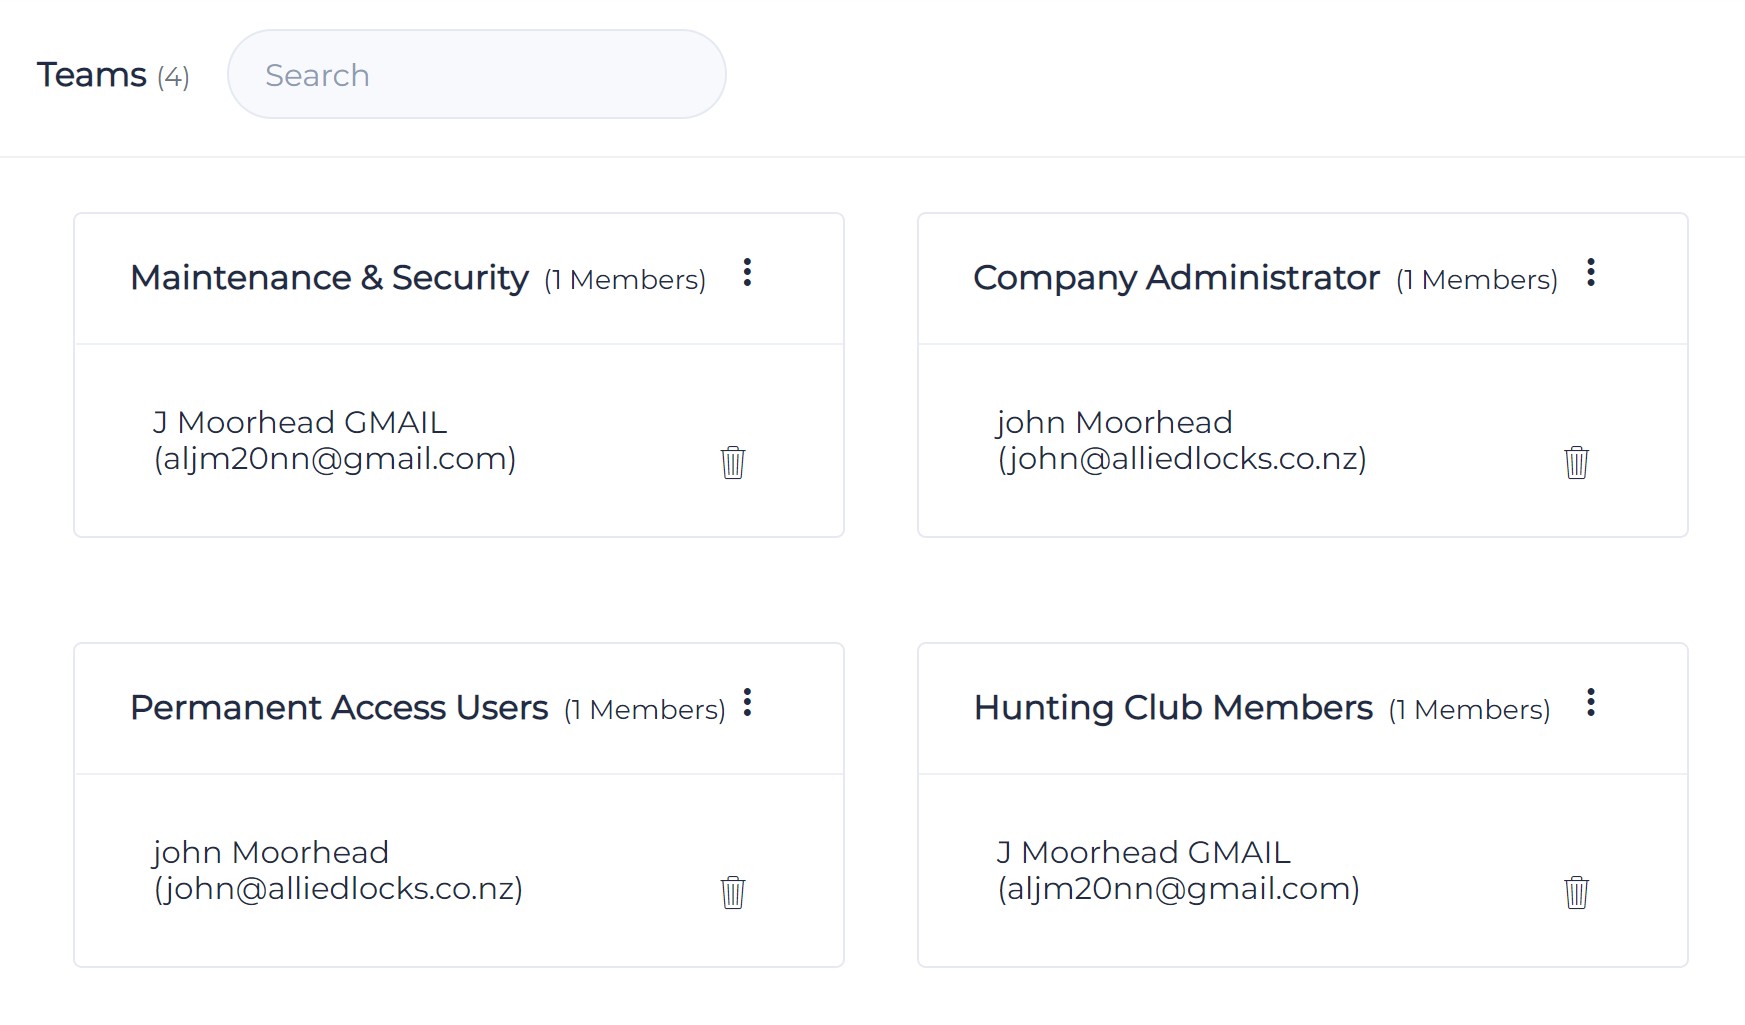
Teams
The Teams page is where you can group together individuals that have a common relationship. Simply create a suitable team name and add the required individuals.
 Unique Code
One Time Access to a single lock using a Unique Code
Example. Driver with access permissions loses their phone. They call the Land owner to give a one time only permission on the passengers phone. They install the RockIT app and use the code sent to activate the smart lock.
Unique codes allows you to quickly give someone access. Perfect for contractors, last minute access and support. Unique codes can be valid for a maximum of 6 months
Unique Codes need to be enabled for each user via setting before the option will show up.
After clicking ‘New Unique Code’ button on the Unique Codes page you’ll see the pop up on the left.
- Enter a clear description so that you know whom/what the code is for
- Set your desired expiry time using the calendar dropdown. Maximum 6 months validity
- To share a Lock, go to the Locks page and select required lock and click ‘Share’
- Toggle ‘Unique Code’
- Select required code from the dropdown
- Click next and leave on ‘View’ and ignore ‘Time Restrictions’ on the following two screens.
- Don’t forget to send the unique code to relevant party by email or text.

Example text or email
To gain access to Smart Locks
Install the RockIT App on your mobile phone
https://apps.apple.com/us/app/rockit-lock/id1592422861
https://play.google.com/store/apps/details?id=and.apps.allied.rockit
Open app and Login with Unique Code
e.g. (I47FKIBL2)
For instructions and support see https://rockitlock.com/instructionsandsupport/
Multiple time access to Multiple Locks for Multiple People
Example. A unique code created for the companies Emergency Services. All the users have to do is install the RockIT app then enter the code to gain access to the smart lock.
By setting up access to a Lock Groups the users have access to multiple locks without any time restrictions for a period of up to 6 months when a new code will be shared.
- Create the Unique Code with a clear description, consider adding the expiry date. Eg Emergency Services expire 31Dec23 (I47FKIBL2)
- Go to the Lock Group with smart locks to be accessed. The Unique Code is automatically updated when locks are added or removed.
- Select Share and check the Unique Code button
- Use the drop arrow to select the Unique Code the Next
- Select the Restricted option then Next
- Select the Time Restrictions From and To 6 months later. Select Share
- Don’t forget to send the unique code to relevant party by email or text.
Example text or email
To gain access to Smart Locks
Install the RockIT App on your mobile phone
https://apps.apple.com/us/app/rockit-lock/id1592422861
https://play.google.com/store/apps/details?id=and.apps.allied.rockit
Open app and Login with Unique Code
e.g. (I47FKIBL2)
For instructions and support see https://rockitlock.com/instructionsandsupport/
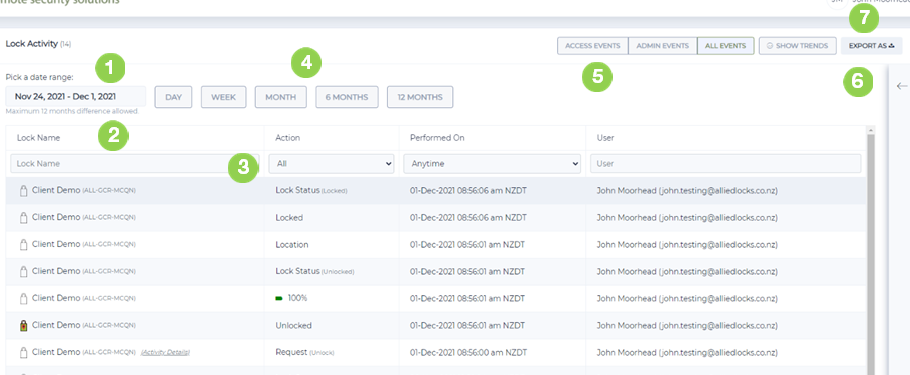
Activity
The LockVue Activity page allows you to see usage what has been occurring throughout your network of locks. Only locks that the account is ‘Owner’ of, or has ‘Admin’ access for to will show on this page
The Activity page defaults to the ‘Access Events’ view so that you only see activity related to unlocking locks and devices. Will be the clickable “unlock request” line where you get the more detailed pop up and also lock status type events as separate lines.
The ‘Admin Events’ view is all activity related to lock management such as sharing, renaming and activating locks.
The ‘All Events’ view provides full detail of events that are occurring
1 Pick predefined ranges or a custom date range to see activity for a particular time period
2 Click column headings to sort by that category
3 Type, or select options, in the filter row to filter by attributes
4 Select on optional pre-set time periods.
5 Select various pre-set event option and trend
6 Click the arrow (circled) at right of screen to see some more details about an event such as the location it occurred
7 Use ‘Export’ to download the selected date range of data as a pdf or csv file for extra processing
Note if multiple people have their apps open at the same time and the smart lock is activated then it will shown on their app if they are within Bluetooth range. If one person selects to unlock, lock or remove the shackle then this data will be recorded on all the mobile phones. The phone in effect enables the transfer and collection of data to and from the smartlock to the cloud portal.
Users will only ever see the locks on their app that they have a granted permission.
Reports (Exception)
Activity Details can be sorted by various date period options to assist the client with the review of suspected lock and user permission access breaches. Exception alerts are reported where a login and password is being used across multiple mobile devices. These are breaches of the terms and conditions of use.
Valid Occurrences that are acceptable are where a user
- changes their phone device or
- Client agrees that a user gains access from multiple devices
- in an emergency shares their access to another party
Breaches that are not acceptable are where a user
- Intentionally shares their email login and password for another party to gain access.
- Consider either revoking the users permission immediately or warning.
